Onboarding the swiyu Base & Trust Registry
Public Beta
Please be advised that the current system and its operations are provided on a best-effort basis and will continue to evolve over time. The security of the system and its overall maturity remain under development.
Before being able to act as an issuer or verifier in the swiyu ecosystem you will need to publish your public key material on the base registry and optionally metadata, a name, on the trust registry. Here you can find a step-by-step guide to get onboarded.
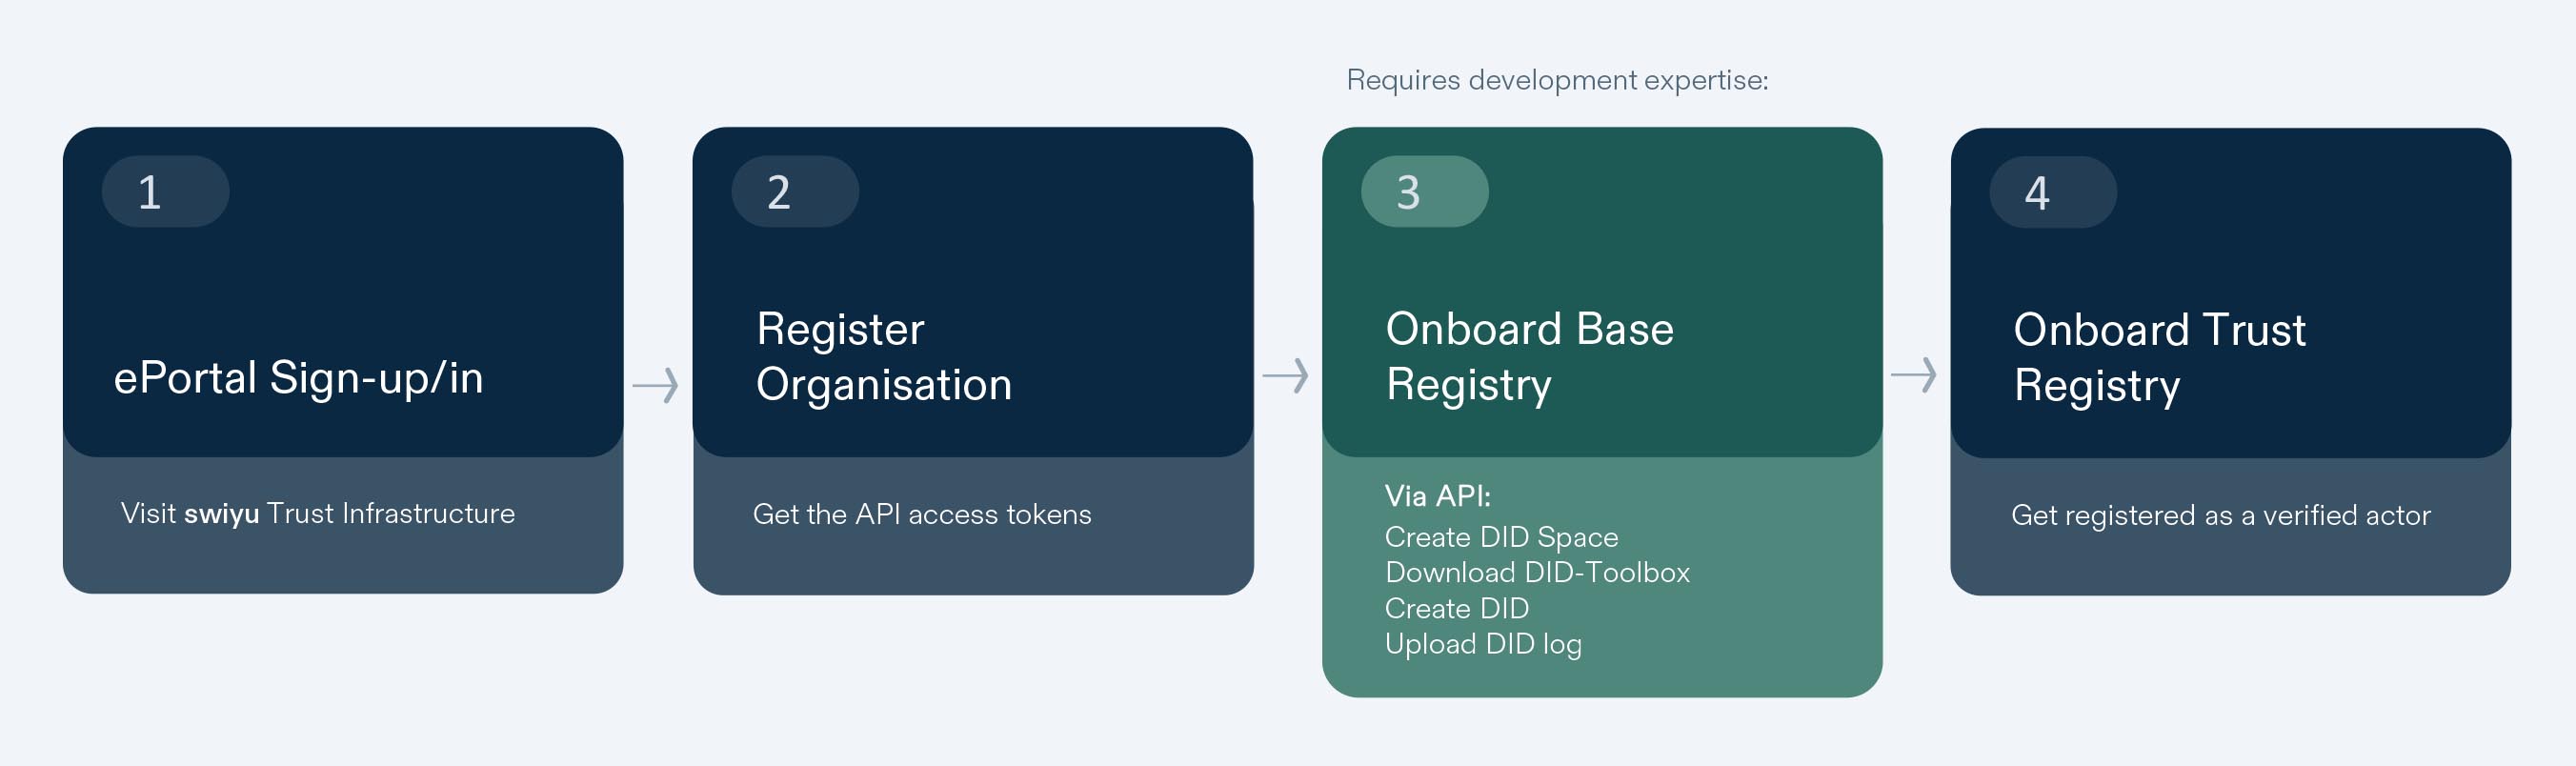
The process consists of four steps. Technical knowledge is required for the third step. Please take into account the prerequisites if you intend to create DIDs with our DID Toolbox.
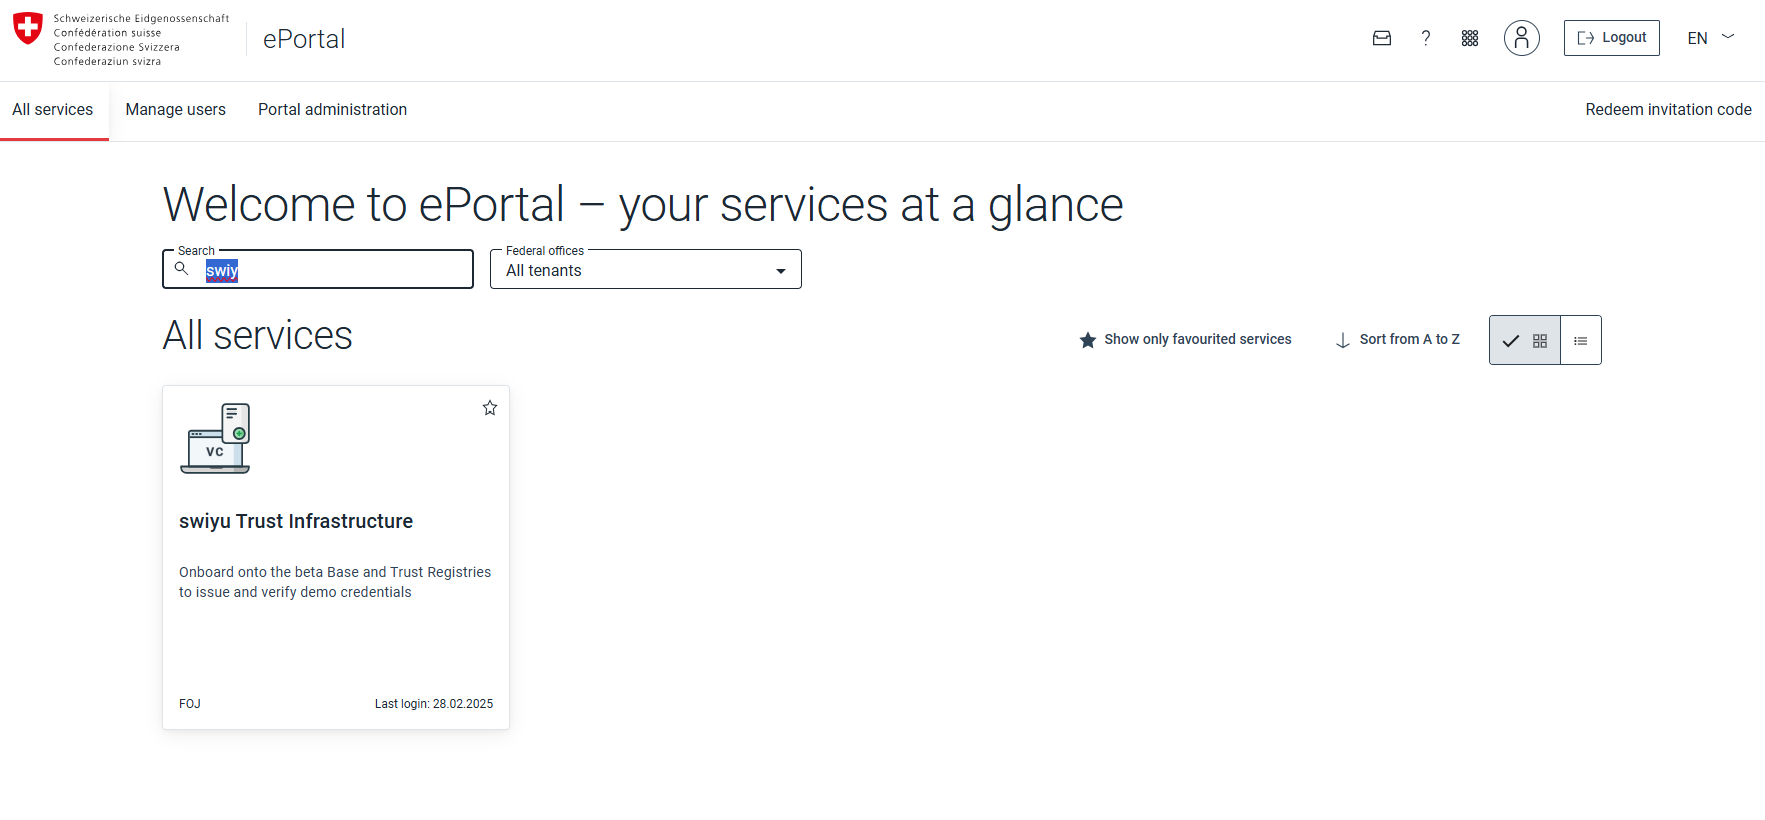
1. Sign-in or up to ePortal
Login or sign up into ePortal via AGOV or CH-Login accounts in order to register to the Trust and Base registry
Open swiyu Trust Infrastructure
Search for the swiyu Trust Infrastructure service and enter it.
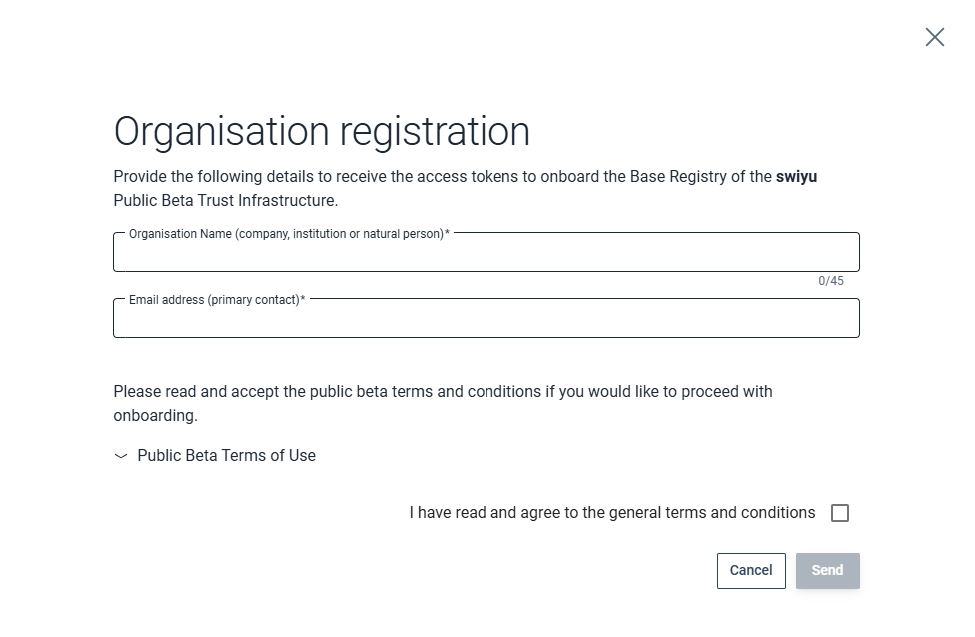
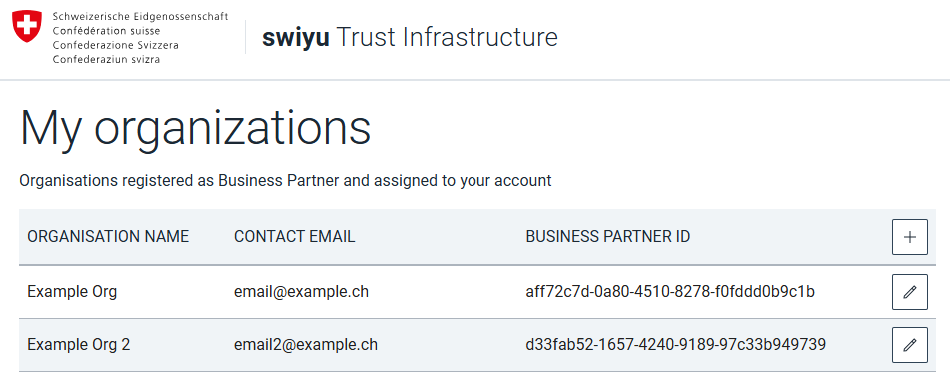
2. Register Organisation
Business Partner registration
To join an existing business partner, see: Join an existing business partner
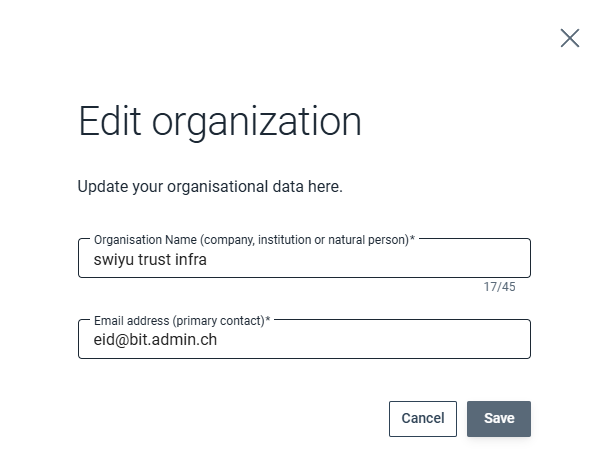
Register the business partner 1 by providing a name 2 and primary contact email.
Edit business partner
Click the edit button in the business partner overview to edit the name or contact email address of the business partner.
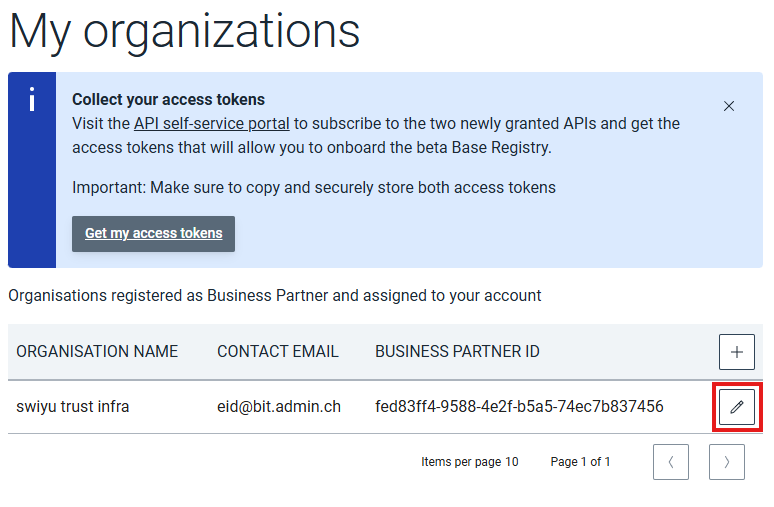
Get API keys to access swiyu APIs
Go to the API self-service portal to register for the ecosystem APIs.
If you are registered with multiple business partners, you can click the business partner ID on the top right in order to select with which one you want to subscribe.
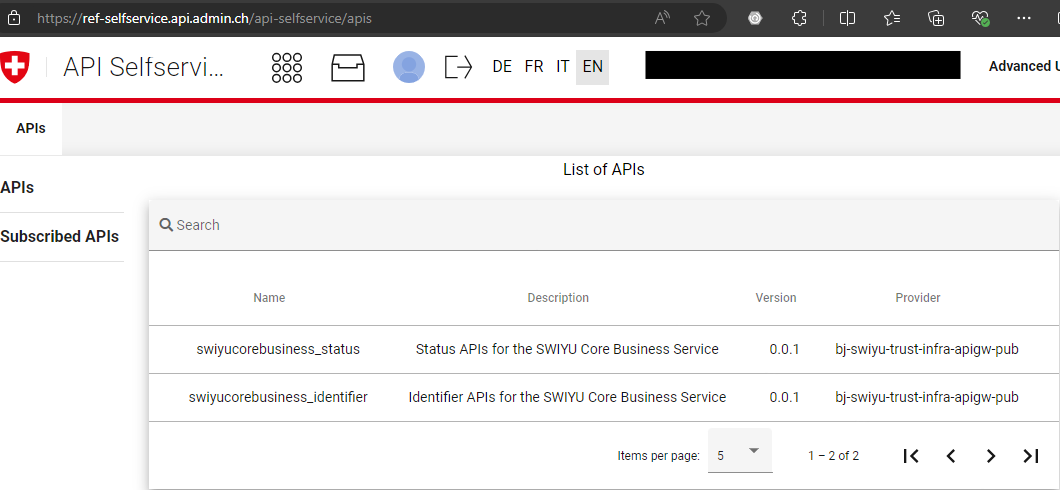
swiyucorebusiness_identifier: Use this API to update your public key material on the Base Registry.
swiyucorebusiness_status: Use this API to manage your status list.
Subscribe with your business partner to both swiyu Core Business Service APIs.
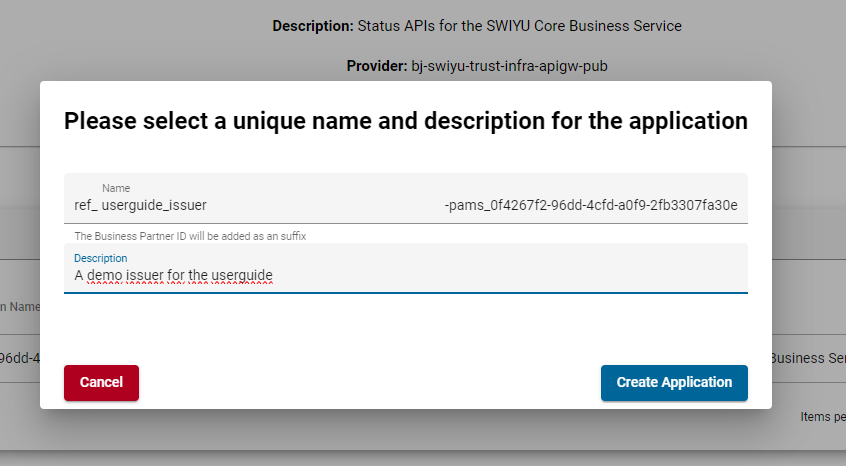
Select an API and press Subscribe. You will be prompted to create a new application or select an existing one.
Note:
⚙️ We suggest creating separate applications and authentication key sets for each service you are running. E.g.: one for your issuer service and another for any verification service.
⚙️ When subscribing with an existing application that already has tokens assigned to it you will need to refresh them in order to work with the newly subscribed API.

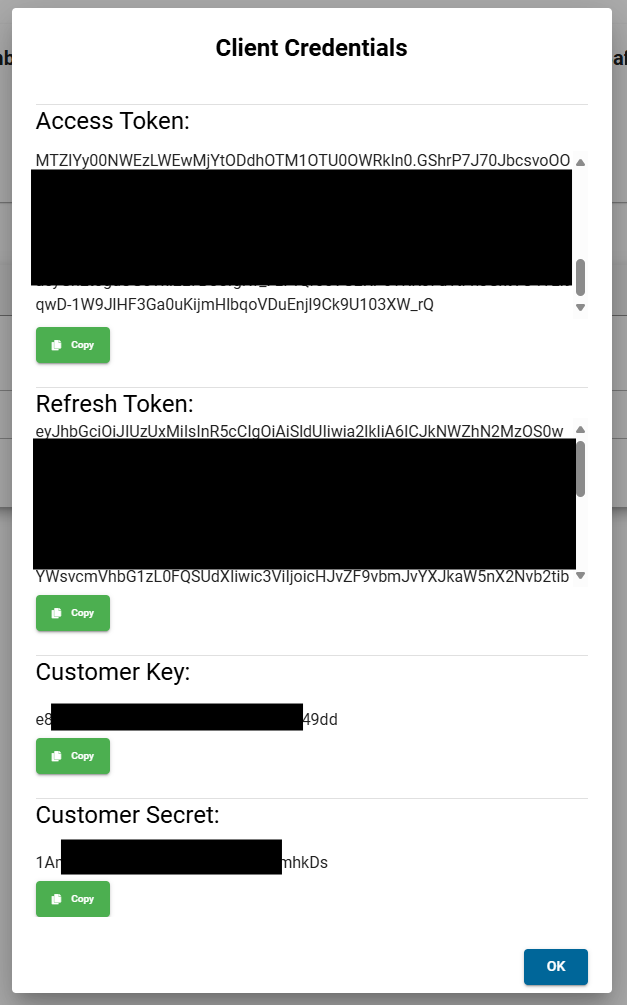
During the onboarding process you will only need the access tokens, when setting up the generic components you will also need the refresh tokens, keys, and secrets.
Important:
⚙️ The output of the application creation will be referenced as:
SWIYU_IDENTIFIER_REGISTRY_CUSTOMER_KEY
SWIYU_IDENTIFIER_REGISTRY_CUSTOMER_SECRET
SWIYU_IDENTIFIER_REGISTRY_BOOTSTRAP_REFRESH_TOKEN
SWIYU_IDENTIFIER_REGISTRY_ACCESS_TOKEN
SWIYU_STATUS_REGISTRY_CUSTOMER_KEY
SWIYU_STATUS_REGISTRY_CUSTOMER_SECRET
SWIYU_STATUS_REGISTRY_BOOTSTRAP_REFRESH_TOKEN
SWIYU_STATUS_REGISTRY_ACCESS_TOKEN
Safely store your keys, secrets and tokens - this is the only time they are shown to you. It is possible to create new ones if necessary.
The ACCESS_TOKEN expires after 24 hours and can be refreshed using the REFRESH_TOKEN. The REFRESH_TOKEN is valid for 168 hours. You can always create new tokens if you lose them or both expire.
Authenticate with OAuth2
Use the access token as bearer token (RFC 6750) when connecting to the subscribed authoring API.
If you want to create a new access token without manual UI interaction you can use the OAuth refresh token flow for the issuer to get valid access tokens for API access.
Base URLs
Use the Swagger Editor for convenience.
| Environment | Identifier Authoring | Status Authoring | Key Manager |
|---|---|---|---|
| swiyu Public Beta | https://identifier-reg-api.trust-infra.swiyu-int.admin.ch | https://status-reg-api.trust-infra.swiyu-int.admin.ch | https://keymanager-prd.api.admin.ch |
In the next step you will need your business partner ID. You can find it in the swiyu Trust Infrastructure dashboard.
3. Onboard on the swiyu Base Registry
Create DID space
In order to onboard on the swiyu Base Registry you will first need to reserve some space.
curl \
  -H "Authorization: Bearer $SWIYU_IDENTIFIER_REGISTRY_ACCESS_TOKEN" \
  -X POST "$SWIYU_IDENTIFIER_REGISTRY_URL/api/v1/identifier/business-entities/$SWIYU_PARTNER_ID/identifier-entries"
API Response 201
{
 "id": "18fa7c77-9dd1-4e20-a147-fb1bec146085",
 "identifier_registry_url": "https://identifier-reg.trust-infra.swiyu-int.admin.ch/api/v1/did/18fa7c77-9dd1-4e20-a147-fb1bec146085"
}
Create a DID (or create the DID log you need to continue)
To actively participate in the swiyu ecosystem as an issuer or verifier, you must create at least one DID and upload the resulting DID log content to the base registry. New DIDs can be created using the DID Toolbox, since it involves a set of steps that are error prone or need some time to get familiar with and one might end up with invalid DIDs.
We recommend creating separate DIDs for each role (e.g., separate DIDs for issuers and verifiers).
Currently, the swiyu ecosystem supports the following DID method: did:webvh, version 0.3.
Prerequisites (using the JAR file)
Before using the DID Toolbox, ensure your system meets the following requirements:
-
Operating System: Compatible with major operating systems. Ensure your OS is up to date to avoid compatibility issues.
- Linux x64 & AArch64
- OSX (AArch64)
- Windows (x64)
- Java Runtime Environment (JRE) 21 or Higher: The DID Toolbox requires Java JRE version 21 or above. Verify that Java is installed on your machine.
- Internet Connection: Required for downloading the tool.
- Sufficient Disk Space: Allocate enough disk space for the tool and the generated key materials. 100 MB should suffice, depending on the number of DIDs you intend to generate.
Downloading the DID Toolbox
The latest release can be downloaded from the repository
Quickstart – Create Your First DID
The Quickstart option is designed for users who want to rapidly set up one or multiple DIDs without getting too much into the DID method internals. This automates the generation of necessary asymmetric key pairs and generates the initial DID log content, which must be uploaded to the swiyu Base Registry later in the process (see Upload DID log).
Command Syntax
To run the DID Toolbox using the Quickstart option, use the following command structure:
Command Samples
# Parameter
java -jar didtoolbox.jar create --identifier-registry-url $IDENTIFIER_REGISTRY_URL

# Example
java -jar didtoolbox.jar create --identifier-registry-url https://identifier-reg.trust-infra.swiyu-int.admin.ch/api/v1/did/18fa7c77-9dd1-4e20-a147-fb1bec146085 > didlog.jsonl
- create: Command to create a new DID
- IDENTIFIER_REGISTRY_URL: URL received as a result of DID space creation from step “Create DID space”
For advanced usage or detailed parameter descriptions, please refer to the DID Toolbox repository.
What Happens Upon Execution
- Key Pair Generation: Three key pairs are created and stored in the .didtoolbox directory (output directory, will be created automatically) in PEM format
Take good care of the generated key material. You will need it again later on (e.g. to configure it in your Issuers and/or Verifiers, see: swiyu Issuer & swiyu Verifier- DID Update Key Pair:
- id_ed25519: Private key (not password protected)
- id_ed25519.pem: Public key
- DID Authentication Key Pair:
- auth-key-01: Private key (not password protected)
- auth-key-01.pem: Public key
- DID Assertion Key Pair:
- assert-key-01: Private key (not password protected)
- assert-key-01.pem: Public key
- DID Update Key Pair:
- DID Log Generation: A DID log line is generated and output to the standard console (stdout). You can redirect this output to a file if necessary. This is the output you need to continue with the step “Upload DID log”.
DID Log Content
The generated DID log content should look similar as shown below. After creation, it consists of a single, albeit lengthy, line.
DID log Sample
[
  "1-QmRdMTkEvFsfkFv8eJp9nUWnecXF3EzDQJhuetHMTVMFdg",
  "2025-03-21T07:38:51Z",
  {
    "method": "did:tdw:0.3",
    "scid": "Qmd9bwsodZ1GAz4h8D7Vy6qRio78voXifDrnXokSTsMVQK",
    "updateKeys": ["z6MknjdKazKDMB66puMBqbMkg5uR834Mr51RYtmdBC9JFvFC"],
    "portable": false,
  },
  {
    "value":
      {
        "@context":
          ["https://www.w3.org/ns/did/v1", "https://w3id.org/security/jwk/v1"],
        "id": "did:tdw:Qmd9bwsodZ1GAz4h8D7Vy6qRio78voXifDrnXokSTsMVQK:identifier-reg.trust-infra.swiyu-int.admin.ch:api:v1:did:18fa7c77-9dd1-4e20-a147-fb1bec146085",
        "authentication":
          [
            "did:tdw:Qmd9bwsodZ1GAz4h8D7Vy6qRio78voXifDrnXokSTsMVQK:identifier-reg.trust-infra.swiyu-int.admin.ch:api:v1:did:18fa7c77-9dd1-4e20-a147-fb1bec146085#auth-key-01",
          ],
        "assertionMethod":
          [
            "did:tdw:Qmd9bwsodZ1GAz4h8D7Vy6qRio78voXifDrnXokSTsMVQK:identifier-reg.trust-infra.swiyu-int.admin.ch:api:v1:did:18fa7c77-9dd1-4e20-a147-fb1bec146085#assert-key-01",
          ],
        "verificationMethod":
          [
            {
              "id": "did:tdw:Qmd9bwsodZ1GAz4h8D7Vy6qRio78voXifDrnXokSTsMVQK:identifier-reg.trust-infra.swiyu-int.admin.ch:api:v1:did:18fa7c77-9dd1-4e20-a147-fb1bec146085#auth-key-01",
              "controller": "did:tdw:Qmd9bwsodZ1GAz4h8D7Vy6qRio78voXifDrnXokSTsMVQK:identifier-reg.trust-infra.swiyu-int.admin.ch:api:v1:did:18fa7c77-9dd1-4e20-a147-fb1bec146085",
              "type": "JsonWebKey2020",
              "publicKeyJwk":
                {
                  "kty": "EC",
                  "crv": "P-256",
                  "x": "5cice-6ILYCD2gFEVFMLPt3HPf5n_OefzOOoP-3SLDA",
                  "y": "lh_YkKQvF_1xv0uYuvy1t6wpDM7au1dMEg2L1I9wDxE",
                  "kid": "auth-key-01",
                },
            },
            {
              "id": "did:tdw:Qmd9bwsodZ1GAz4h8D7Vy6qRio78voXifDrnXokSTsMVQK:identifier-reg.trust-infra.swiyu-int.admin.ch:api:v1:did:18fa7c77-9dd1-4e20-a147-fb1bec146085#assert-key-01",
              "controller": "did:tdw:Qmd9bwsodZ1GAz4h8D7Vy6qRio78voXifDrnXokSTsMVQK:identifier-reg.trust-infra.swiyu-int.admin.ch:api:v1:did:18fa7c77-9dd1-4e20-a147-fb1bec146085",
              "type": "JsonWebKey2020",
              "publicKeyJwk":
                {
                  "kty": "EC",
                  "crv": "P-256",
                  "x": "Z4Hp-L-THKPCUQqYOyICAU7YekPsYwOjrLaiOW_EdXk",
                  "y": "tF0NJM4B5J85zFtvgHNtnk6pV7VY52GAq0nppq2Pop0",
                  "kid": "assert-key-01",
                },
            },
          ],
      },
  },
  [
    {
      "type": "DataIntegrityProof",
      "cryptosuite": "eddsa-jcs-2022",
      "created": "2025-03-21T07:38:51Z",
      "verificationMethod": "did:key:z6MknjdKazKDMB66puMBqbMkg5uR834Mr51RYtmdBC9JFvFC#z6MknjdKazKDMB66puMBqbMkg5uR834Mr51RYtmdBC9JFvFC",
      "proofPurpose": "authentication",
      "challenge": "1-QmRdMTkEvFsfkFv8eJp9nUWnecXF3EzDQJhuetHMTVMFdg",
      "proofValue": "z4yxZfm1nG6AerU5Mg3yrrvqn2mmMRjMJC4999BunnS3hg9SVjicugw8ZWEJYsQkarypDNRAqAjo48bH42ekyMa1c",
    },
  ],
]
In the example above the DID is the following
DID sample
did:tdw:Qmd9bwsodZ1GAz4h8D7Vy6qRio78voXifDrnXokSTsMVQK:identifier-reg.trust-infra.swiyu-int.admin.ch:api:v1:did:18fa7c77-9dd1-4e20-a147-fb1bec146085
Additional Information
- Output Directory: The .didtoolbox directory is automatically created in the current working directory. Ensure you have the necessary permissions to create and write to this directory.
- Security: Keep your private keys secure. Do not share them or expose them in unsecured environments.
- Using Existing DIDs: While the Quickstart option generates new DIDs and key material, the DID Toolbox also supports updating existing DIDs. Please refer to the DID Toolbox repository.
Upload DID log
Use the Identifier API to upload your DID log. Make sure to properly escape the double quotes in the DID log e.g. by using single quotes. Using the sample DID log from above:
Add the DID log you created earlier as string body (not JSON).
'["1-QmRdMTkEvFsfkFv8eJp9nUWnecXF3EzDQJhuetHMTVMFdg","2025-03-21T07:38:51Z",{"method": ..."proofValue":"z4yxZfm1nG6AerU5Mg3yrrvqn2mmMRjMJC4999BunnS3hg9SVjicugw8ZWEJYsQkarypDNRAqAjo48bH42ekyMa1c"}]]'
Make sure the content-type is set to “application/jsonl+json” and you use the –data-binary option to preserve linebreaks for multi line jsonl files.
curl --data-binary '<your-generated-didlog-string-here>' \
  -H "Authorization: Bearer $SWIYU_IDENTIFIER_REGISTRY_ACCESS_TOKEN" \
  -H "Content-Type: application/jsonl+json" \
  -X PUT "https://identifier-reg-api.trust-infra.swiyu-int.admin.ch/api/v1/identifier/business-entities/$SWIYU_PARTNER_ID/identifier-entries/$IDENTIFIER_REGISTRY_ID"
You may also upload the file generated by the didtoolbox directly with the @ notation:
curl --data-binary @didlog.jsonl \
  -H "Authorization: Bearer $SWIYU_IDENTIFIER_REGISTRY_ACCESS_TOKEN" \
  -H "Content-Type: application/jsonl+json" \
  -X PUT "https://identifier-reg-api.trust-infra.swiyu-int.admin.ch/api/v1/identifier/business-entities/$SWIYU_PARTNER_ID/identifier-entries/$IDENTIFIER_REGISTRY_ID"
API Response 200
OK
Get the DID log to confirm
curl "https://identifier-reg.trust-infra.swiyu-int.admin.ch/api/v1/did/$IDENTIFIER_REGISTRY_ID/did.jsonl"
API Response 200
'["1-QmRdMTkEvFsfkFv8eJp9nUWnecXF3EzDQJhuetHMTVMFdg","2025-03-21T07:38:51Z",{"method": ..."proofValue":"z4yxZfm1nG6AerU5Mg3yrrvqn2mmMRjMJC4999BunnS3hg9SVjicugw8ZWEJYsQkarypDNRAqAjo48bH42ekyMa1c"}]]'
Now you are registered on the swiyu Base Registry and be able to configure your issuer and verifier component.
Initialize a status list (issuer only)
If you don’t use the generic issuer you can use the status list API directly:
Initialize a status list
curl -X POST "https://status-reg-api.trust-infra.swiyu-int.admin.ch/api/v1/status/business-entities/$SWIYU_PARTNER_ID/status-list-entries/" \
  -H "Accept: application/json" \
  -H "Authorization: Bearer $SWIYU_STATUS_REGISTRY_ACCESS_TOKEN" \
  -d ""
API Response 200
{
 "id": "18fa7c77-9dd1-4e20-a147-fb1bec146085",
 "statusRegistryUrl": "https://status-registry.admin.ch/api/v1/statuslist/18fa7c77-9dd1-4e20-a147-fb1bec146085.jwt"
}
Update status list
curl -X PUT "https://status-reg-api.trust-infra.swiyu-int.admin.ch/api/v1/status/business-entities/$SWIYU_PARTNER_ID/status-list-entries/$STATUS_REGISTRY_ID" \
  -H "Content-Type: application/statuslist+jwt" \
  -H "Authorization: Bearer $SWIYU_STATUS_REGISTRY_ACCESS_TOKEN" \
  -d "Status list content according to https://www.ietf.org/archive/id/draft-ietf-oauth-status-list-02.html#name-status-list-request"
API Response 200
OK
ⓘ The maximum file size of the status list is currently 200kB. (Subject to evaluation and might change after public beta).
This means one status list can hold 100.000 entries for revocation & suspension or 200.000 entries for revocation only.
4. Become a trusted participant
To be acclaimed as a trusted issuer or verifier you need to additionally contact us by using the form found on the swiyu Trust Infrastructure service
During the mail registration you should provide us the following information
| Attribute | Required | Description |
|---|---|---|
| Email contact | Yes | Email address of the technical contact for the onboarding |
| DID of the beta Base Registry | Yes | Decentralized identifier created during the beta Base Registry onboarding. E.g.: did:tdw:3AbbA3bA3AbbbbbbAAAAAAb3bb33Ab33AAb3AAAA3AAbAAAAAbbbbbbAAAA3AbAbbbbbbbAAAAbAAAAAbbb3A3bAbbAbb:identifier-reg.trust-infra.swiyu-int.admin.ch:api:v1:did:AAAAAAAA-BBBB-1111-2222-000000000000 |
| Organisation name | Yes | Name of your organization in at least the preferred language. Additional values can be provided in English, German, French, Italian and Rumantsch |
| Preferred language | Yes | English, German, French, Italian or Rumantsch |

5. User management
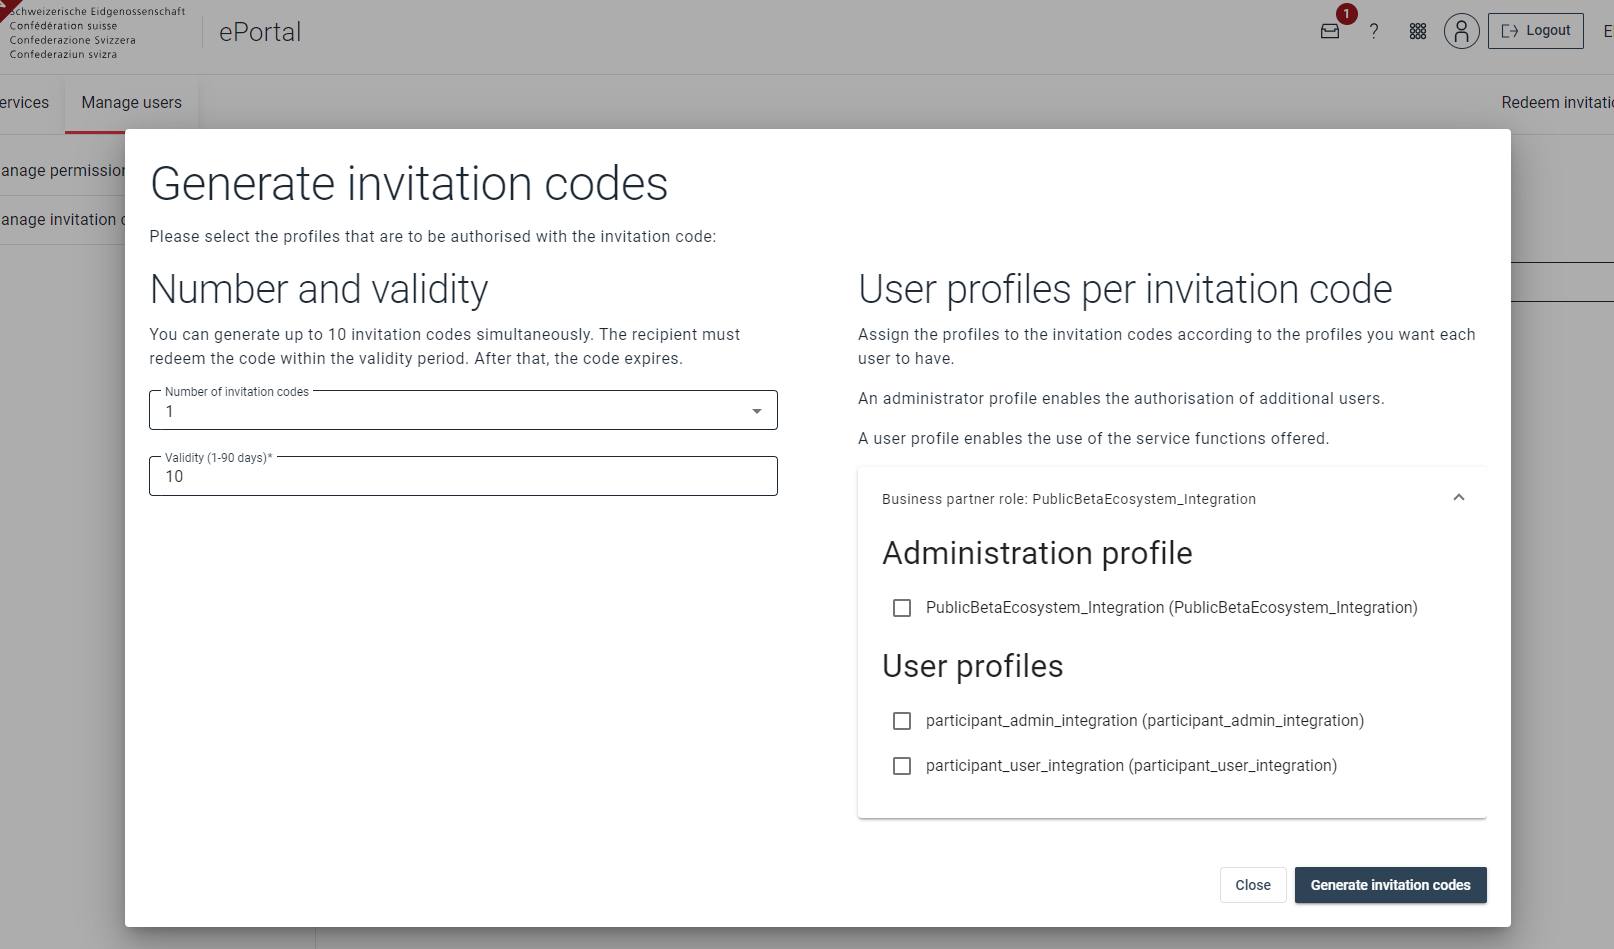
Invite members to your business partner
Go to e-portal and click on manage users:
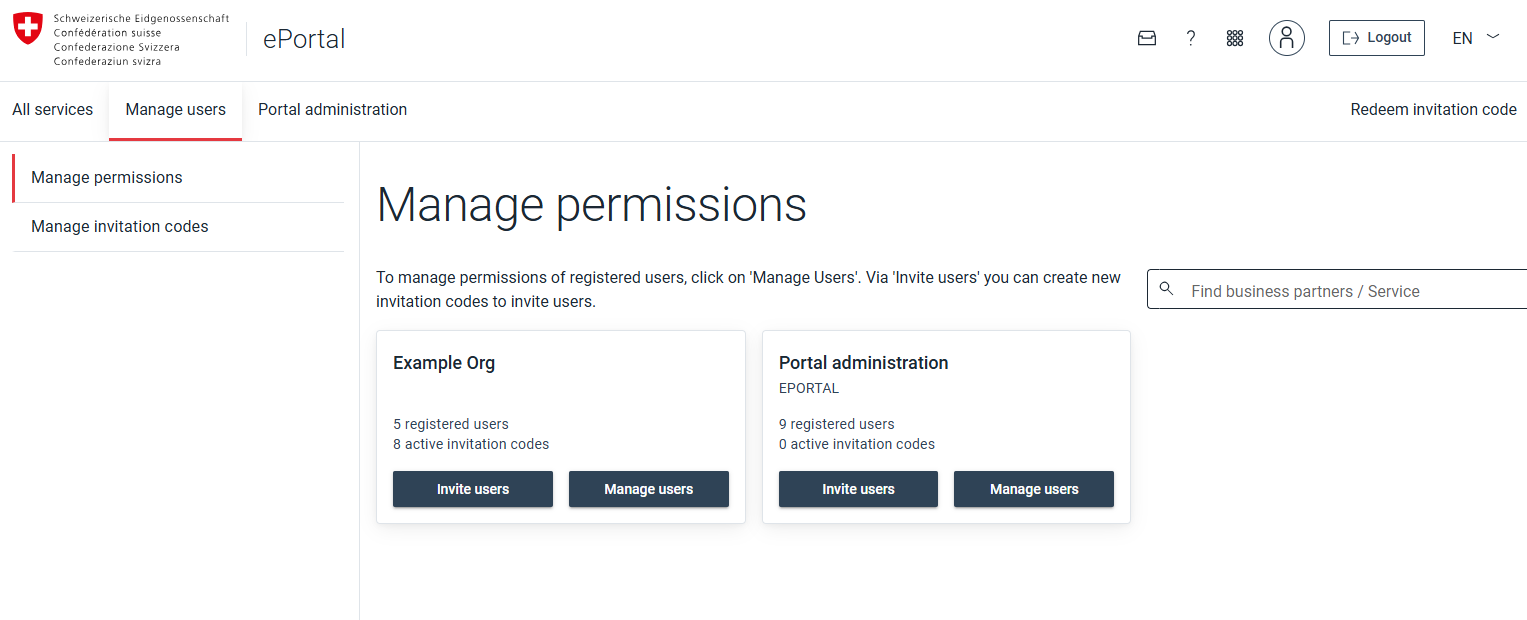
Generate as many invitation codes as you need and make sure to add the appropriate roles.
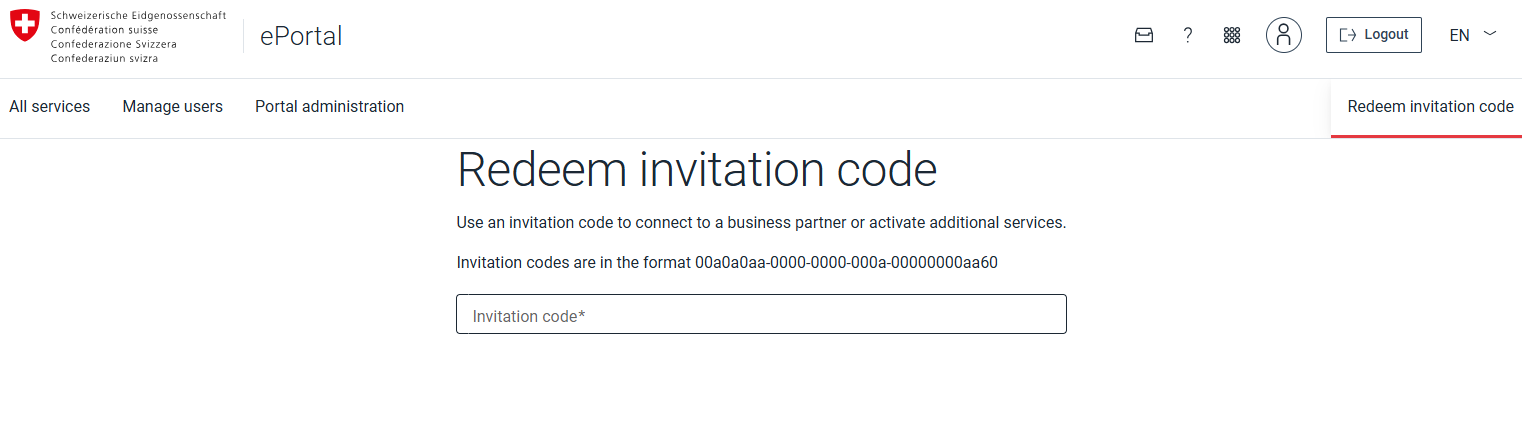
Join an existing business partner
To Join an already existing business partner, press the Redeem invitation code button on the top right.
ⓘ Be aware it might take a few minutes until the just joined business partner is visible in the UI.
Use/Integrate the swiyu Trust Infrastructure
One way to interact with the swiyu ecosystem is to host either a swiyu Generic Issuer and/or a swiyu Generic Verifier or bring your own implementation. Instructions on how to setup the components can be found in the swiyu Generic Issuer cookbook and the swiyu Generic Verifier cookbook.
Optional: Design the visualization for Issuer, Verifier, and Credential
In the swiyu wallet app, verifiable credentials (VC) are visually represented as cards to allow users to easily recognise and utilise them. If you like to implement your visual identity, please follow the steps in the VC visual presentation cookbook.
Your Feedback?
We would be pleased if you spend about 3 additional minutes and give us feedback on the swiyu Public Beta Trust Infrastructure and your onboarding process! With Public Beta, we want to give ecosystem stakeholders the opportunity to gain initial experience and build their own use cases on the trust infrastructure of the future e-ID. Your feedback will help us to further develop and improve the touchpoints, and we greatly appreciate your support.
-
Under “business partner” is understood any type of company, private or public institution, but also individuals (natural persons) can register themselves as a business partner on the swiyu Trust Infrastructure and use it. ↩
-
This name cannot be changed. To appear with another name, you will have to register a new business partner. ↩