Getting started with the swiyu Generic Verifier
Public Beta
Please be advised that the current system and its operations are provided on a best-effort basis and will continue to evolve over time. The security of the system and its overall maturity remain under development.
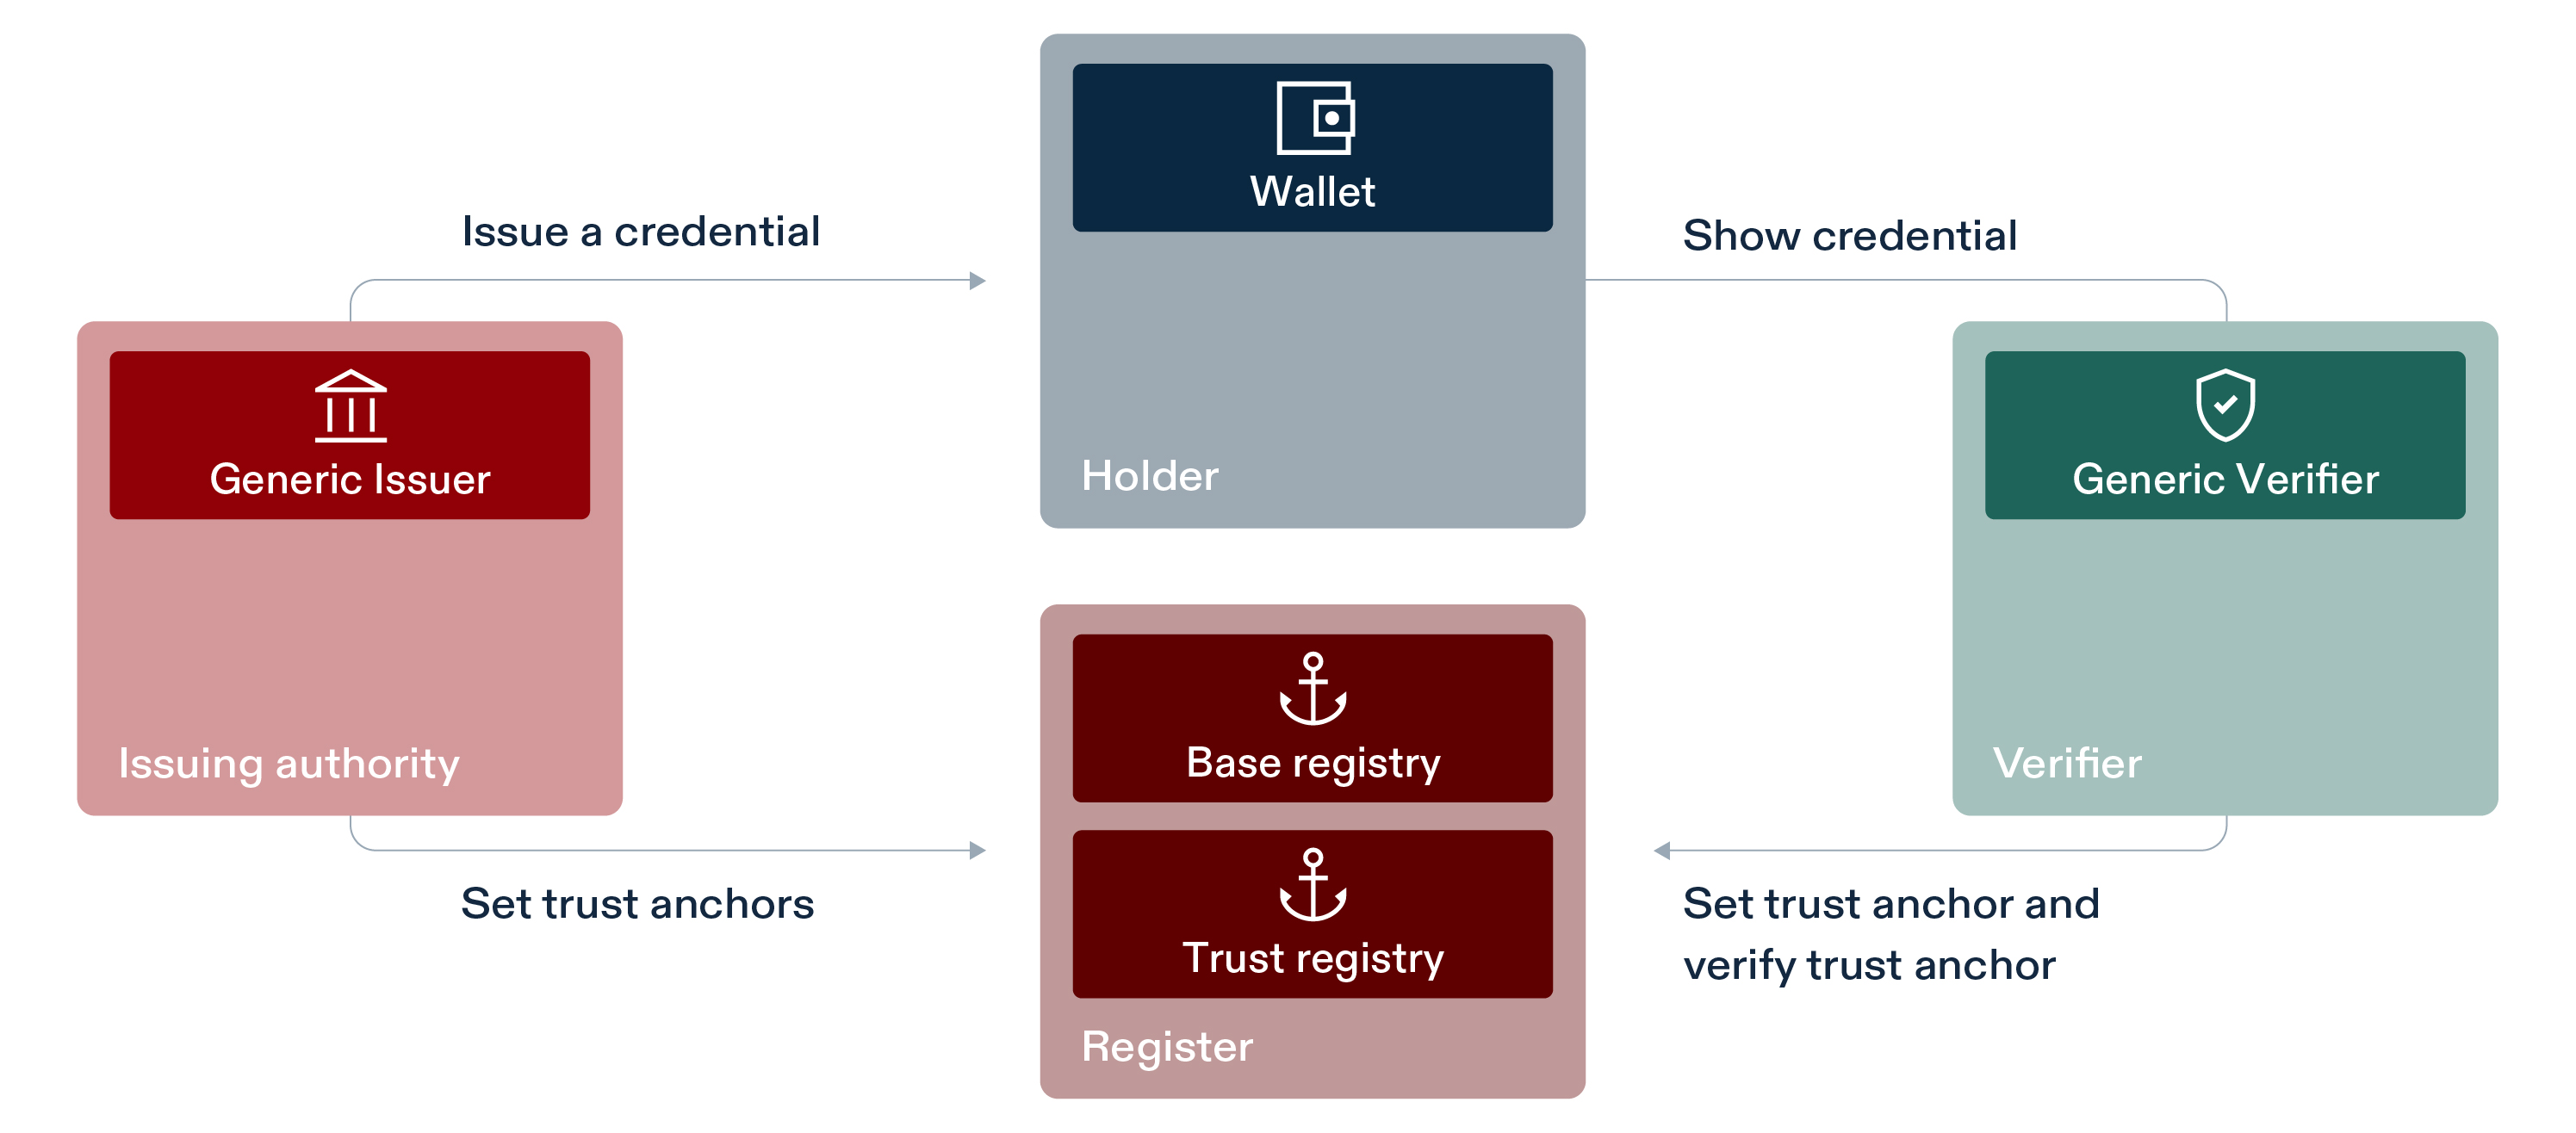
This software is a web server implementing the technical standards as specified in the “Swiss Profile Verification”. Together with the other generic components provided, this software forms a collection of APIs allowing issuance and verification of verifiable credentials without the need of reimplementing the standards.
Deployment instructions
Please make sure that you did the following before starting the deployment:
- Registered yourself on the swiyu Trust Infrastructure portal
- Registered yourself on the API self-service portal
- Generated signing keys e.g. using the
didtoolbox.jar- Generated a DID which is registered on the identifier registry
The required steps are explained in the Base- and Trust Registry Cookbook
Set the environment variables
A sample compose file can be found in sample.compose.yml file. You also need to configure a list of environment variables in the .env file and adapt the
verifier metadata to your use case.
The metadata information will be provided to the holder on a dedicated endpoint (/oid4vp/api/openid-client-metadata.json) serving as metadata information of your verifier.
| Name | Description | Example |
|---|---|---|
EXTERNAL_URL |
This will be used to build the correct verification_deeplink (You must provide the /oid4vp endpoints there) -> must use https-protocol otherwise the wallet will refuse to connect. | |
VERIFIER_DID |
DID you created during the onboarding | did:tdw:QmejrSkusQgeM6FfA23L6NPoLy3N8aaiV6X5Ysvb47WSj8:identifier-reg.trust-infra.swiyu-int.admin.ch:api:v1:did:ff8eb859-6996-4e51-a976-be1ca584c124 |
DID_VERIFICATION_METHOD |
Verification method, which can be taken from the did log response. The Verification Method must match the selected SIGNING_KEY! onboarding process method | did:tdw:Qmd9bwsodZ1GAz4h8D7Vy6qRio78voXifDrnXokSTsMVQK:identifier-reg.trust-infra.swiyu-int.admin.ch:api:v1:did:18fa7c77-9dd1-4e20-a147-fb1bec146085#auth-key-01 |
SIGNING_KEY |
EC Private key, which can be taken from onboarding process you can use any generated key but it must match the DID_VERIFICATION_METHOD |
Please note that by default configuration the verifier service is set up in a way to easily gain experience with the verification process, not as a productive deployment. For additional information how to securely deploy the swiyu-verifier check out the Deployment considerations in the readme.
The provided images can be used with arm based processors, but they are not optimized. For further information, please consult the Development instructions section.
The latest image is available here:
Creating a verification
For a detailed understanding of the verification process and the data structure of verification please consult the Verification Documentation More details about the DIF presentation exchange can be found here.
Once the service is deployed you can create your first verification request. For this you first need to define a presentation definition. Based on that definition you can then create a verification request as shown in the example below.
Below you find an example for a verification request to check the age_over_18 from a Beta Credential Service (BCS) Credential The following request can be performed by using the swagger endpoint for the sample environment.
Request
curl -X 'POST' 'http://localhost:8083/management/api/verifications' \
  -H "Content-Type: application/json" \
  -d '{
    "accepted_issuer_dids": [
        "${ISSUER_DID}"
    ],
    "response_mode": "direct_post",
    "presentation_definition": {
        "id": "00000000-0000-0000-0000-000000000000",
        "input_descriptors": [
            {
                "id": "11111111-1111-1111-1111-111111111111",
                "format": {
                    "vc+sd-jwt": {
                        "sd-jwt_alg_values": [
                            "ES256"
                        ],
                        "kb-jwt_alg_values": [
                            "ES256"
                        ]
                    }
                },
                "constraints": {
                    "fields": [
                        {
                            "path": [
                                "$.vct"
                            ],
                            "filter": {
                                "type": "string",
                                "const": "betaid-sdjwt"
                            }
                        },
                        {
                            "path": [
                                "$.age_over_18"
                            ]
                        }
                    ]
                }
            }
        ]
    }
}'
"id" field from the response above into shell variable VERIFICATION_ID, as the is required in the "Get the verification result" call.
accepted_issuer_dids: This field contains a list of DIDs from credential issuers whose credentials your verifier will accept. Replace the ${ISSUER_DID} placeholder with the actual DID of your issuer. For quick testing with the Beta Credential Service (BCS) Public Beta, you can use: did:tdw:QmPEZPhDFR4nEYSFK5bMnvECqdpf1tPTPJuWs9QrMjCumw:identifier-reg.trust-infra.swiyu-int.admin.ch:api:v1:did:9a5559f0-b81c-4368-a170-e7b4ae424527. Then issue a credential using BCS Public Beta-ID and verify it with your own verifier.
Response
The response contains a "verification_deeplink" field which points to the verification request, that you have created. To use the link, create a deep-link QR code from the "verification_deeplink" response field and scan it with the swiyu-Wallet app.
{
  "id": "${VERIFICATION_ID}",
  "request_nonce": "a-nonce",
  "state": "PENDING",
  "presentation_definition": {
    "id": "00000000-0000-0000-0000-000000000000",
    "input_descriptors": [
      {
        "id": "11111111-1111-1111-1111-111111111111",
        "format": {
          "vc+sd-jwt": {
            "sd-jwt_alg_values": ["ES256"],
            "kb-jwt_alg_values": ["ES256"]
          }
        },
        "constraints": {
          "fields": [
            {
              "path": ["$.vct"],
              "filter": {
                "type": "string",
                "const": "betaid-sdjwt"
              }
            },
            {
              "path": ["$.age_over_18"]
            }
          ]
        }
      }
    ]
  },
  "verification_url": "https://<external url of this service>/oid4vp/api/request-object/${REQUEST_ID}",
  "verification_deeplink": "swiyu-verify://?client_id=..."
}
💡 On Linux/macOS, the shell variables VERIFICATION_ID,VERIFICATION_URL and VERIFICATION_DEEPLINK may also be set automatically by combining
the curl command above with commands like jq and qrencode
thus building a one-liner like this:
source <(curl -s \
  -X 'POST' 'http://localhost:8083/management/api/verifications' \
  -H 'accept: */*' \
  -H 'Content-Type: application/json' \
  -d '{
  "accepted_issuer_dids": [
    "${ISSUER_DID}"
  ],
  "response_mode": "direct_post",
  "presentation_definition": {
    "id": "00000000-0000-0000-0000-000000000000",
    "input_descriptors": [
        {
            "id": "11111111-1111-1111-1111-111111111111",
            "format": {
                "vc+sd-jwt": {
                    "sd-jwt_alg_values": [
                        "ES256"
                    ],
                    "kb-jwt_alg_values": [
                        "ES256"
                    ]
                }
            },
            "constraints": {
                "fields": [
                    {
                        "path": [
                            "$.vct"
                        ],
                        "filter": {
                            "type": "string",
                            "const": "betaid-sdjwt"
                        }
                    },{
                        "path": [
                            "$.age_over_18"
                        ]
                    }
                ]
            }
        }
    ]
  }
}' | jq -r '"VERIFICATION_ID="+.id+"\nVERIFICATION_URL="+.verification_url+"\nVERIFICATION_DEEPLINK=\""+.verification_deeplink+"\"\necho\necho $VERIFICATION_DEEPLINK | qrencode -t ansiutf8"')
💡Thanks to qrencode command, the one-liner above would also render a deep-link QR code (for swiyu-Wallet app) directly in terminal.
Get the verification result
Request
${VERIFICATION_ID} with the actual ID of the verification, or just ensure the shell variable VERIFICATION_ID has already been set accordingly.
curl -X GET \
  -H "Accept: application/json" \
  http://localhost:8083/management/api/verifications/${VERIFICATION_ID}
Development instructions
Instructions for the development of the swiyu Generic Verifier can be found in the GitHub repository.
Create Images for ARM based processors
In order to optimize the image for arm based systems, you first have to check out the GitHub repository.
To create an image you to run the following command in the repository to create a local images of the service:
./mvnw spring-boot:build-image
Your Feedback?
We would be pleased if you spend about 3 additional minutes and give us feedback on the swiyu Public Beta Trust Infrastructure and your onboarding process! With Public Beta, we want to give ecosystem stakeholders the opportunity to gain initial experience and build their own use cases on the trust infrastructure of the future e-ID. Your feedback will help us to further develop and improve the touchpoints, and we greatly appreciate your support.