Onboarding the swiyu Base & Trust Registry
Public Beta
Please be advised that the current system and its operations are provided on a best-effort basis and will continue to evolve over time. The security of the system and its overall maturity remain under development.
1. Variable Reference
The following variables are used in the commands and examples throughout this guide.
1.1. API Credentials
Obtained from the self-service portal during step 2.3.
| Variable | Description |
|---|---|
SWIYU_IDENTIFIER_REGISTRY_CUSTOMER_KEY |
OAuth2 client ID for the swiyucorebusiness_identifier API |
SWIYU_IDENTIFIER_REGISTRY_CUSTOMER_SECRET |
OAuth2 client secret for the swiyucorebusiness_identifier API |
SWIYU_IDENTIFIER_REGISTRY_BOOTSTRAP_REFRESH_TOKEN |
Initial refresh token for the swiyucorebusiness_identifier API (valid 168 h) |
SWIYU_IDENTIFIER_REGISTRY_ACCESS_TOKEN |
Bearer token for the swiyucorebusiness_identifier API (valid 24 h) |
SWIYU_STATUS_REGISTRY_CUSTOMER_KEY |
OAuth2 client ID for the swiyucorebusiness_status API |
SWIYU_STATUS_REGISTRY_CUSTOMER_SECRET |
OAuth2 client secret for the swiyucorebusiness_status API |
SWIYU_STATUS_REGISTRY_BOOTSTRAP_REFRESH_TOKEN |
Initial refresh token for the swiyucorebusiness_status API (valid 168 h) |
SWIYU_STATUS_REGISTRY_ACCESS_TOKEN |
Bearer token for the swiyucorebusiness_status API (valid 24 h) |
SWIYU_TRUST_REGISTRY_CUSTOMER_KEY |
OAuth2 client ID for the swiyucorebusiness_trust API |
SWIYU_TRUST_REGISTRY_CUSTOMER_SECRET |
OAuth2 client secret for the swiyucorebusiness_trust API |
SWIYU_TRUST_REGISTRY_BOOTSTRAP_REFRESH_TOKEN |
Initial refresh token for the swiyucorebusiness_trust API (valid 168 h) |
SWIYU_TRUST_REGISTRY_ACCESS_TOKEN |
Bearer token for the swiyucorebusiness_trust API (valid 24 h) |
All credentials are shown once in the self-service portal when you create an application. The ACCESS_TOKEN can be refreshed using the REFRESH_TOKEN. Both can be regenerated in the portal at any time if lost.
1.2. Business Partner & DID Space
| Variable | Description | Where to get it |
|---|---|---|
PARTNER_ID |
UUID identifying your business partner | Shown in the top-right corner of the self-service portal |
IDENTIFIER_REGISTRY_ENTRY_ID |
UUID of a specific DID space entry | The id field in the GET /identifier/ response (step 3.1) |
IDENTIFIER_REGISTRY_URL |
Public URL where your DID log is hosted | The identifierRegistryUrl field in the GET /identifier/ response (step 3.1) |
1.3. DID Toolbox
Generated by didtoolbox create in step 3.2. All key files are written to the .didtoolbox/ directory in your working directory.
| Variable | Description | Default location |
|---|---|---|
DID_LOG_PATH |
Path to your local DID log file | did.jsonl (stdout redirect from didtoolbox create) |
SIGNING_KEY_PEM |
Ed25519 private key used to sign DID log entries | .didtoolbox/id_ed25519 |
VERIFYING_KEY_PEM |
Ed25519 public key corresponding to the signing key | .didtoolbox/id_ed25519.pub |
ASSERT_KEY_NAME |
Name you assign to the assertion verification method | Chosen by you (e.g. my-assert-key-01) |
ASSERT_PUBLIC_KEY_PEM |
Public key PEM file for the assertion method | .didtoolbox/assert-key-01.pub |
AUTH_KEY_NAME |
Name you assign to the authentication verification method | Chosen by you (e.g. my-auth-key-01) |
AUTH_PUBLIC_KEY_PEM |
Public key PEM file for the authentication method | .didtoolbox/auth-key-01.pub |
1.4. Proof of Possession
| Variable | Description | Where to get it |
|---|---|---|
ID_OF_PUBLIC_KEY |
Full DID key ID used to sign the PoP (e.g. did:webvh:...#assert-key-01) |
The id field of a verification method in your DID document |
PRIVATE_KEY_PEM_FILE_PATH |
Private key corresponding to the chosen public key | In .didtoolbox/ (e.g. .didtoolbox/assert-key-01) |
NONCE |
Unique challenge string provided by the trust registry | Provided by the trust registry when initiating a trust submission |
POP_JWT |
Signed JWT produced by didtoolbox create-pop |
Output of step 4 |
2. Subscribe to Swiyu Trust Infrastructure APIs
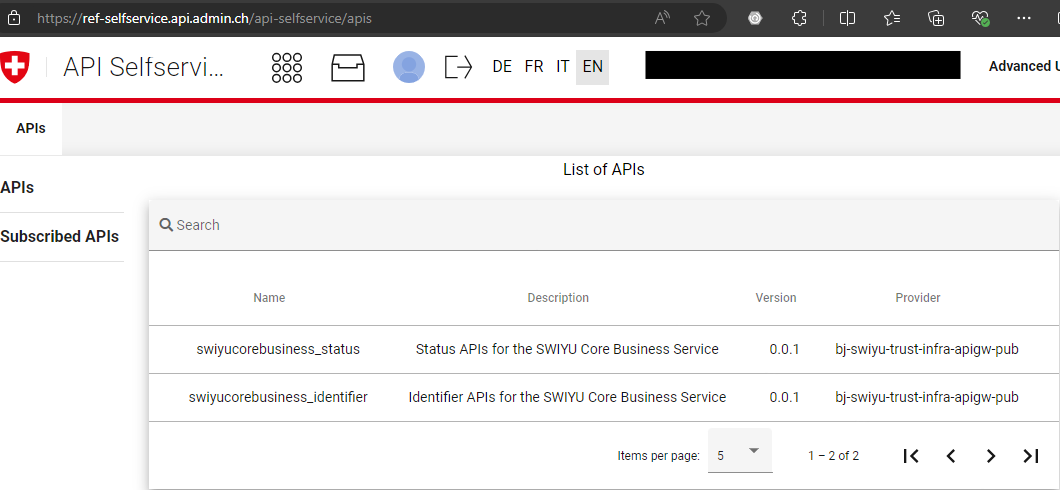
Go to the API self-service portal to subscribe to the swiyu Trust Infrastructure APIs.
2.1. Select your Business Partner
If you are registered with multiple business partners, click the business partner ID in the top-right corner of the portal to select the one you want to subscribe with.
2.2. Subscribe to the APIs
The swiyu Trust Infrastructure consists of three APIs. Subscribe your business partner to each of them:
swiyucorebusiness_identifier: Use this API to manage your public key material on the Base Registry.
swiyucorebusiness_status: Use this API to manage your credential status lists.
swiyucorebusiness_trust: Use this API to manage your organisation’s trust verification submissions.
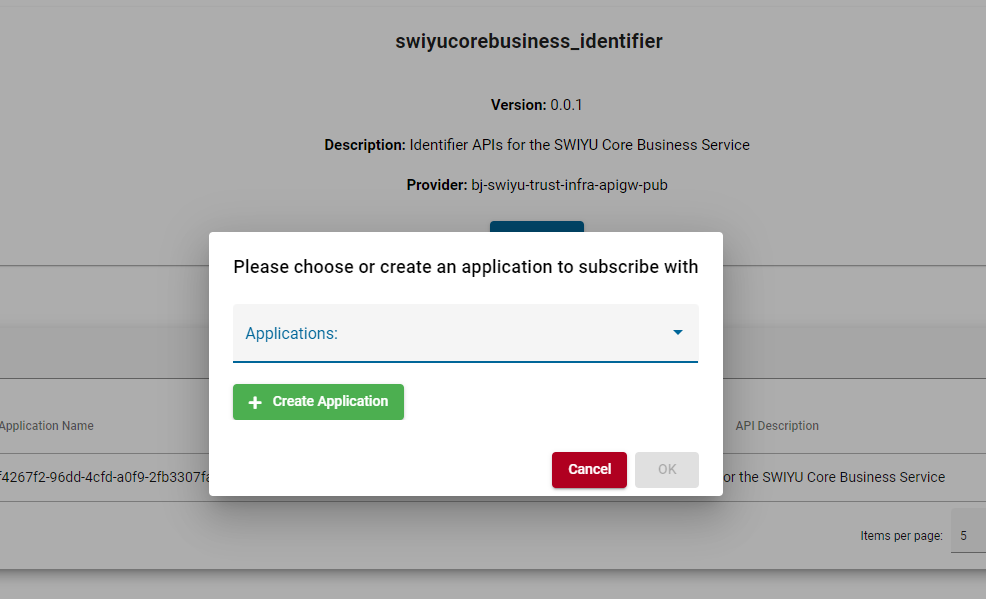
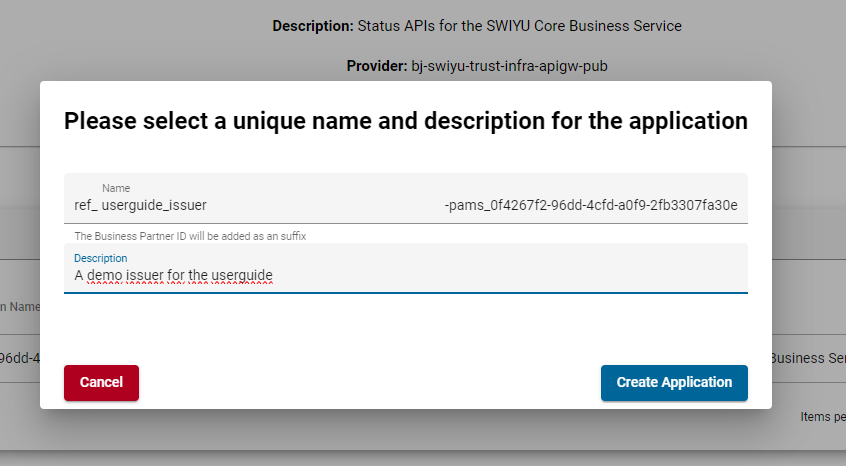
For each API, select it and press Subscribe. You will be prompted to create a new application or select an existing one.
Note:
⚙️ One application and its token set grants access to all APIs it is subscribed to. However, the application must be individually subscribed to each API.
⚙️ We suggest creating separate applications for each service you are running — e.g. one for your issuer service and one for your verifier service.
⚙️ When subscribing an existing application to an additional API, you will need to refresh its tokens so they include the new subscription scope.
2.3. Save Your Tokens
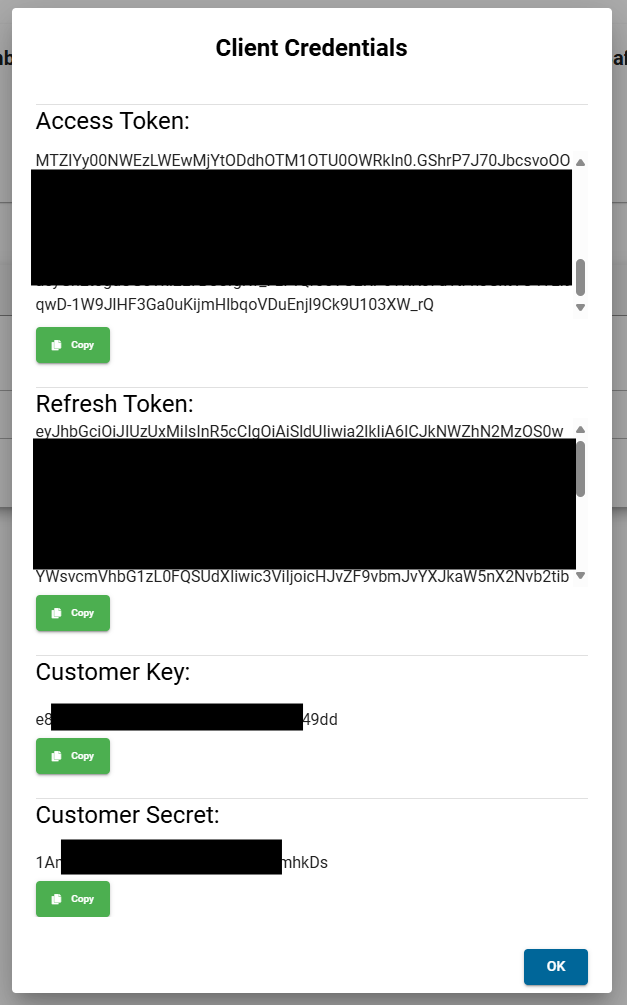
After subscribing, copy and securely store the access and refresh tokens shown for your application.
Important:
⚙️ The output of the application creation will be referenced as:
SWIYU_IDENTIFIER_REGISTRY_CUSTOMER_KEY
SWIYU_IDENTIFIER_REGISTRY_CUSTOMER_SECRET
SWIYU_IDENTIFIER_REGISTRY_BOOTSTRAP_REFRESH_TOKEN
SWIYU_IDENTIFIER_REGISTRY_ACCESS_TOKEN
SWIYU_STATUS_REGISTRY_CUSTOMER_KEY
SWIYU_STATUS_REGISTRY_CUSTOMER_SECRET
SWIYU_STATUS_REGISTRY_BOOTSTRAP_REFRESH_TOKEN
SWIYU_STATUS_REGISTRY_ACCESS_TOKEN
SWIYU_TRUST_REGISTRY_CUSTOMER_KEY
SWIYU_TRUST_REGISTRY_CUSTOMER_SECRET
SWIYU_TRUST_REGISTRY_BOOTSTRAP_REFRESH_TOKEN
SWIYU_TRUST_REGISTRY_ACCESS_TOKEN
Safely store your keys, secrets, and tokens — this is the only time they are shown to you. It is possible to create new ones if necessary.
The ACCESS_TOKEN expires after 24 hours and can be refreshed using the REFRESH_TOKEN. The REFRESH_TOKEN is valid for 168 hours. You can always create new tokens if you lose them or both expire.
2.4. API Documentation
Interactive API reference documentation is available for each of the three APIs:
- swiyucorebusiness_identifier API reference
- swiyucorebusiness_status API reference
- swiyucorebusiness_trust API reference
3. Create your first DID
Creating a DID involves fetching your provisioned DID space, generating the DID log locally with the DID Toolbox, and uploading it. DID spaces are provisioned for you during the swiyu onboarding process.
3.1. Fetch your DID Spaces
Call the swiyucorebusiness_identifier API to list the DID spaces provisioned for your business partner. Each entry represents a DID space on the Base Registry.
# Parameter
curl -X GET \
  "https://identifier-reg-api.trust-infra.swiyu-int.admin.ch/api/v1/identifier/business-entities/$PARTNER_ID/identifier/" \
  -H "Authorization: Bearer $SWIYU_IDENTIFIER_REGISTRY_ACCESS_TOKEN"

# Example response
{
  "content": [
    {
      "id": "18fa7c77-9dd1-4e20-a147-fb1bec146085",
      "identifierRegistryUrl": "https://identifier-reg.trust-infra.swiyu.admin.ch/api/v1/did/18fa7c77-9dd1-4e20-a147-fb1bec146085",
      "status": "NOT_INITIALIZED"
    }
  ],
  ...
}
status: NOT_INITIALIZED — this is the space that has not yet been populated with a DID log. Save its id and identifierRegistryUrl, referenced below as IDENTIFIER_REGISTRY_ENTRY_ID and IDENTIFIER_REGISTRY_URL.
3.2. Generate the DID Log
Use the DID Toolbox to generate a DID log for your reserved space. Pass the identifierRegistryUrl from step 3.1 as the --identifier-registry-url parameter.
When no key material is supplied, the DID Toolbox automatically generates Ed25519 key pairs and saves them as PEM files in a .didtoolbox/ directory relative to your working directory. The DID log is written to stdout.
# Parameter
java -jar didtoolbox.jar create \
  --identifier-registry-url $IDENTIFIER_REGISTRY_URL \
  > did.jsonl

# Example
java -jar didtoolbox.jar create \
  --identifier-registry-url "https://identifier-reg.trust-infra.swiyu.admin.ch/api/v1/did/18fa7c77-9dd1-4e20-a147-fb1bec146085" \
  > did.jsonl
Note:
⚙️ The generated key files in .didtoolbox/ are required for subsequent operations such as updating your DID or creating a Proof of Possession. Store them securely.
⚙️ If you already have existing Ed25519 key pairs, supply them with --signing-key-file and --verifying-key-files. See the DID Toolbox documentation for advanced key management options including Java KeyStore (PKCS12) and Securosys Primus HSM support.
3.3. Upload the DID Log
Upload the generated did.jsonl to your reserved DID space using the PUT endpoint. Use the IDENTIFIER_REGISTRY_ENTRY_ID from step 3.1.
# Parameter
curl -X PUT \
  "https://identifier-reg-api.trust-infra.swiyu-int.admin.ch/api/v1/identifier/business-entities/$PARTNER_ID/identifier-entries/$IDENTIFIER_REGISTRY_ENTRY_ID" \
  -H "Authorization: Bearer $SWIYU_IDENTIFIER_REGISTRY_ACCESS_TOKEN" \
  -H "Content-Type: application/jsonl+json" \
  --data-binary @did.jsonl

# Example
curl -X PUT \
  "https://identifier-reg-api.trust-infra.swiyu-int.admin.ch/api/v1/identifier/business-entities/8432e1f3-8119-4fb9-a879-190ab2cb9deb/identifier-entries/18fa7c77-9dd1-4e20-a147-fb1bec146085" \
  -H "Authorization: Bearer $SWIYU_IDENTIFIER_REGISTRY_ACCESS_TOKEN" \
  -H "Content-Type: application/jsonl+json" \
  --data-binary @did.jsonl
A 200 OK response confirms your DID is now published on the Base Registry and resolvable at the identifierRegistryUrl.
3.4. Update an Existing DID Log
Use the update command to rotate keys or change the verification methods of an existing DID. The command appends a new version entry to the DID log and writes the updated log to stdout.
Important:
The update command requires you to supply all keys that should be present in the new version — not just the changed ones. Any key omitted from the update will be removed from the DID document.
# Parameter
java -jar didtoolbox.jar update \
  --did-log-file $DID_LOG_PATH \
  --assert $ASSERT_KEY_NAME,$ASSERT_PUBLIC_KEY_PEM \
  --auth $AUTH_KEY_NAME,$AUTH_PUBLIC_KEY_PEM \
  --signing-key-file $SIGNING_KEY_PEM \
  --verifying-key-files $VERIFYING_KEY_PEM \
  > did-updated.jsonl

# Example (using the key files generated in step 3.2)
java -jar didtoolbox.jar update \
  -d did.jsonl \
  -a my-assert-key-01,.didtoolbox/assert-key-01.pub \
  -t my-auth-key-01,.didtoolbox/auth-key-01.pub \
  -s .didtoolbox/id_ed25519 \
  -v .didtoolbox/id_ed25519.pub \
  > did-updated.jsonl
Upload the updated log to the Base Registry using the same PUT endpoint as in step 3.3:
curl -X PUT \
  "https://identifier-reg-api.trust-infra.swiyu-int.admin.ch/api/v1/identifier/business-entities/$PARTNER_ID/identifier-entries/$IDENTIFIER_REGISTRY_ENTRY_ID" \
  -H "Authorization: Bearer $SWIYU_IDENTIFIER_REGISTRY_ACCESS_TOKEN" \
  -H "Content-Type: application/jsonl+json" \
  --data-binary @did-updated.jsonl
4. Create Proof of Possession for initial did
After uploading your DID log (step 3.3), you must prove to the trust registry that you control the private key corresponding to your DID’s assertion method. A proof of possession (PoP) is a JSON Web Token (JWT) signed with a private key from your DID document. It can be created with the DID Toolbox.
Prerequisites:
- A valid DID log containing at least 1 public key.
- The corresponding private key for that public key.
- A nonce — a unique challenge string provided by the trust registry.
4.1. Fetch the Challenge
Call the swiyucorebusiness_trust API to retrieve the pending trust onboarding submission for your business partner. The response provides the DID and a one-time nonce.
# Parameter
curl -X GET \
  "https://trust-reg-api.trust-infra.swiyu-int.admin.ch/api/v1/trust/trust-onboarding-submission/proof-of-possessions" \
  -H "Authorization: Bearer $SWIYU_TRUST_REGISTRY_ACCESS_TOKEN"

# Example response
[
  {
    "did": "did:tdw:QmfNchmAvY4EJ7WrxaiWRyrspV9B8dSRzUgcs4CWUggiBD:identifier-reg.trust-infra.swiyu.admin.ch:api:v1:did:18fa7c77-9dd1-4e20-a147-fb1bec146085",
    "nonce": "99A2BF79-3575-4824-87A5-8F66E6E8C2C7"
  }
]
Save the did and nonce values — they are referenced below as DID and NONCE.
4.2. Create the Proof of Possession
Use the DID Toolbox to sign the nonce with your assertion private key.
# Parameter
java -jar didtoolbox.jar create-pop \
  -d $DID_LOG_PATH \
  -k $ID_OF_PUBLIC_KEY \
  -s $PRIVATE_KEY_PEM_FILE_PATH \
  -n $NONCE

# Example
java -jar didtoolbox.jar create-pop \
  -d did.jsonl \
  -k "did:tdw:QmfNchmAvY4EJ7WrxaiWRyrspV9B8dSRzUgcs4CWUggiBD:identifier-reg.trust-infra.swiyu.admin.ch:api:v1:did:18fa7c77-9dd1-4e20-a147-fb1bec146085#assert-key-01" \
  -s .didtoolbox/assert-key-01 \
  -n "99A2BF79-3575-4824-87A5-8F66E6E8C2C7"
Save the output JWT as POP_JWT.
4.3. Submit the Proof of Possession
Upload the signed JWT to complete the trust onboarding submission.
# Parameter
curl -X POST \
  "https://trust-reg-api.trust-infra.swiyu-int.admin.ch/api/v1/trust/trust-onboarding-submission/proof-of-possessions" \
  -H "Authorization: Bearer $SWIYU_TRUST_REGISTRY_ACCESS_TOKEN" \
  -H "Content-Type: application/json" \
  -d "{\"proofOfPossessions\": [\"$POP_JWT\"]}"

# Example
curl -X POST \
  "https://trust-reg-api.trust-infra.swiyu-int.admin.ch/api/v1/trust/trust-onboarding-submission/proof-of-possessions" \
  -H "Authorization: Bearer $SWIYU_TRUST_REGISTRY_ACCESS_TOKEN" \
  -H "Content-Type: application/json" \
  -d '{"proofOfPossessions": ["eyJhbGciOiJFZERTQSIsInR5cCI6IkpXVCJ9..."]}'
A 200 OK response confirms your trust onboarding submission has been accepted and your DID is now registered in the trust registry.
5. Adding Additional DIDs
Once your first DID is onboarded, you can register additional DIDs under the same business partner. Each new DID must be accompanied by a trust-add-dids submission containing proofs of possession from both your existing (permission) DID and every new DID being added.
5.1. Create a New Identifier Entry
Request a new DID space for your business partner via the swiyucorebusiness_identifier API.
# Parameter
curl -X POST \
  "https://identifier-reg-api.trust-infra.swiyu-int.admin.ch/api/v1/identifier/business-entities/$PARTNER_ID/identifier-entries/" \
  -H "Authorization: Bearer $SWIYU_IDENTIFIER_REGISTRY_ACCESS_TOKEN" \
  -H "Content-Type: application/json"

# Example response
{
  "id": "a3c9e12f-0451-4bde-bf7c-3a0f918db20e",
  "identifierRegistryUrl": "https://identifier-reg.trust-infra.swiyu.admin.ch/api/v1/did/a3c9e12f-0451-4bde-bf7c-3a0f918db20e",
  "status": "NOT_INITIALIZED"
}
Save the id as IDENTIFIER_REGISTRY_ENTRY_ID_2 and identifierRegistryUrl as IDENTIFIER_REGISTRY_URL_2.
5.2. Generate and Upload the DID Log
Repeat step 3.2 and step 3.3 for the new identifier entry, using IDENTIFIER_REGISTRY_URL_2 as the --identifier-registry-url argument and IDENTIFIER_REGISTRY_ENTRY_ID_2 in the PUT request path. Store the resulting key files in a separate working directory (e.g. did2/) to keep them distinct from your first DID’s keys.
5.3. Create the Trust Add DIDs Submission
Submit a request to add the new DID to the trust registry. Provide your existing permission DID (the DID already registered in the trust registry) and the list of new DID(s) to add. The response contains a shared nonce that must be signed by all DIDs involved.
# Parameter
curl -X POST \
  "https://trust-reg-api.trust-infra.swiyu-int.admin.ch/api/v1/trust/trust-add-dids-submissions" \
  -H "Authorization: Bearer $SWIYU_TRUST_REGISTRY_ACCESS_TOKEN" \
  -H "Content-Type: application/json" \
  -d "{\"permissionDid\": \"$DID\", \"didsToAdd\": [\"$NEW_DID\"]}"

# Example response
{
  "id": "b7f3a1c5-9e24-4d61-a8c0-2e5f7b3d1a9e",
  "nonce": "A1B2C3D4-E5F6-7890-ABCD-EF1234567890"
}
Save the id as TRUST_ADD_SUBMISSION_ID and the nonce as NONCE_2.
5.4. Create Proof of Possession JWTs
Create one PoP JWT for each DID involved — your existing permission DID and every new DID being added. All PoPs use the same NONCE_2.
# PoP for the existing permission DID (authorises the addition)
java -jar didtoolbox.jar create-pop \
  -d did.jsonl \
  -k "$DID#assert-key-01" \
  -s .didtoolbox/assert-key-01 \
  -n "$NONCE_2"

# PoP for the new DID
java -jar didtoolbox.jar create-pop \
  -d did2.jsonl \
  -k "$NEW_DID#assert-key-01" \
  -s did2/.didtoolbox/assert-key-01 \
  -n "$NONCE_2"
Save the outputs as POP_JWT_1 (permission DID) and POP_JWT_2 (new DID).
5.5. Submit All Proofs of Possession
Upload all PoP JWTs in a single call to the trust-add-dids submission endpoint.
# Parameter
curl -X POST \
  "https://trust-reg-api.trust-infra.swiyu-int.admin.ch/api/v1/trust/trust-add-dids-submissions/$TRUST_ADD_SUBMISSION_ID" \
  -H "Authorization: Bearer $SWIYU_TRUST_REGISTRY_ACCESS_TOKEN" \
  -H "Content-Type: application/json" \
  -d "{\"proofOfPossessions\": [\"$POP_JWT_1\", \"$POP_JWT_2\"]}"

# Example
curl -X POST \
  "https://trust-reg-api.trust-infra.swiyu-int.admin.ch/api/v1/trust/trust-add-dids-submissions/b7f3a1c5-9e24-4d61-a8c0-2e5f7b3d1a9e" \
  -H "Authorization: Bearer $SWIYU_TRUST_REGISTRY_ACCESS_TOKEN" \
  -H "Content-Type: application/json" \
  -d '{"proofOfPossessions": ["eyJhbGciOiJFZERTQSIsInR5cCI6IkpXVCJ9...", "eyJhbGciOiJFZERTQSIsInR5cCI6IkpXVCJ9..."]}'
A 200 OK response confirms the new DID(s) have been added to the trust registry.
6. Updating an existing DID
To update an existing DID — for example to rotate keys — generate a new DID log using the update command of the DID Toolbox (see step 3.4) and upload it to the Base Registry using the PUT endpoint. The new log replaces the existing one for that identifier entry.
# Parameter
curl -X PUT \
  "https://identifier-reg-api.trust-infra.swiyu-int.admin.ch/api/v1/identifier/business-entities/$PARTNER_ID/identifier-entries/$IDENTIFIER_REGISTRY_ENTRY_ID" \
  -H "Authorization: Bearer $SWIYU_IDENTIFIER_REGISTRY_ACCESS_TOKEN" \
  -H "Content-Type: application/jsonl+json" \
  --data-binary @did-updated.jsonl

# Example
curl -X PUT \
  "https://identifier-reg-api.trust-infra.swiyu-int.admin.ch/api/v1/identifier/business-entities/8432e1f3-8119-4fb9-a879-190ab2cb9deb/identifier-entries/18fa7c77-9dd1-4e20-a147-fb1bec146085" \
  -H "Authorization: Bearer $SWIYU_IDENTIFIER_REGISTRY_ACCESS_TOKEN" \
  -H "Content-Type: application/jsonl+json" \
  --data-binary @did-updated.jsonl
A 200 OK response confirms the updated DID log is published and the DID document is resolved from the new log.